
The first line of code I wrote was back in 1992, 31 years ago. That must make me an old man, and perhaps I am, but back then I was only seven — and my first program I wrote?
I used QBASIC to output ASCII Art (it was just called “Graphics” back then) to output a series of crayons. I don’t think I have that code anymore, considering it was on an Intel 8088 my father had garbage picked from his work, and the data was stored on a 10MB hard card, but it was something as easy as this:

Kind of useless, perhaps, but as my first program I learned a few things
- How to clear the screen (10 CLS)
- How to take a string and output it to the monitor (PRINT “etc”)
- How to end a program (END or SYSTEM, I forget)
- How to change the colors of the output text (COLOR 1, for example)
My father later had taught me LPRINT, which allowed me to kick that same data over the parallel port and print it.
While I don’t have that old 10MB hard card, I have disks ranging from double height MFM / CHS drives in the double MB range up to a few that are 4TB in size. Most of the stuff I’d want are on the older, smaller FAT12 IDE drives that have dealt some major blows:
- Kids don’t maintain things nice. When I had a new drive, I’d throw the old ones in a box, a drawer, under my bed, wherever
- I moved 50 miles from where my folks lived, these have probably went a decade untouched at this point or more
- I moved 80 miles from there a few years later. Here, the drives were in a milk crate in a barn that has literally rusted every pair of pliers I’ve owned due to condensing water vapor and an outbuilding that was built halfway into the ground. It had mice build nests on and pee on them, and I’ve dropped them quite a few times. Here, I did try to plug them in and access them just as normal disks — but didn’t get much.
- I then moved 970 miles away. These things sat in a storage unit for months where mold grew on some of my stuff, then they bounced around in the back of a UHaul for that entire trip until I got them to where they are now
- Being lazy, I again just tried accessing them with a few machines, probably doing more damage.
But then, I got serious…
I was looking at “retro PCs” on eBay, and you can get hundreds of dollars if you just kept old shit around, sadly during my move I tossed almost everything. The only machine I had that supported native IDE had some legit issues where it would constantly crash. IDE to USB connectors, while cheap, either don’t give off enough power or have “BIOS-level” support for MFM / CHS drives. I didn’t know what to do, but I remembered a computer I had as a kid that I fell in love with… A Compaq Deskpro 386/16. So, being a dumbass, I bought it for $150 from eBay. When it got here though, it was a fantastic time in memory lane, the yellowing of the plastics, the older style way boards were made, Compaq being a bunch of proprietary jerks by using their own power supply, screws, etc.
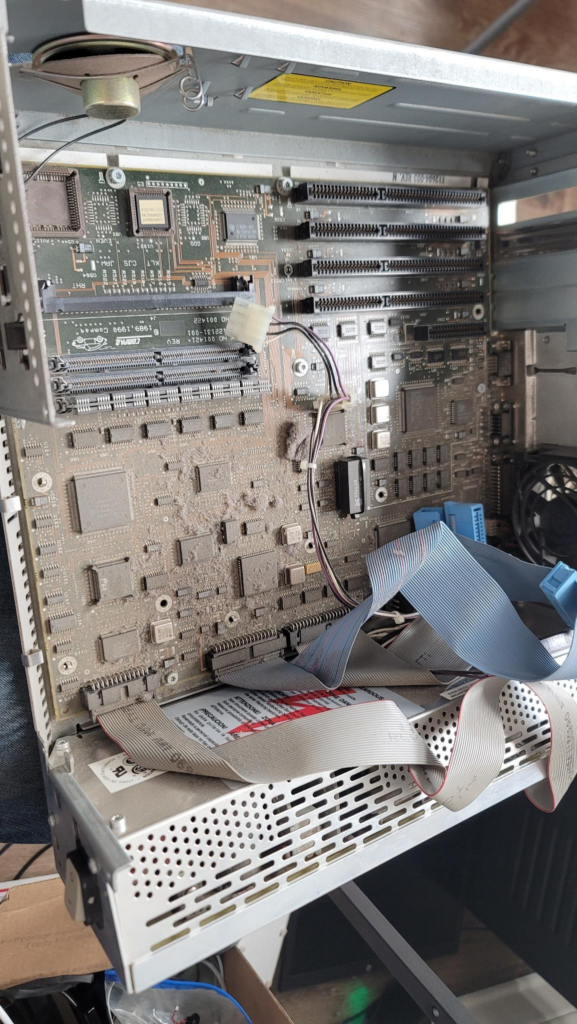
I immediately tore into it, as soon as I took off the drive bay you can see just how dusty this thing was. I had time though, and tore apart the entire machine and blew it off and got it ready to use.
I also ordered a few creature comforts, since all of my other machines are pretty modern:
- GoTek Floppy Emulator — You use a weirdly crafted USB drive and you can select a number on the front. This will emulate a diskette so you can install FreeDOS, MS-DOS, Windows, etc — or in this machines case, run BIOS setup since there’s no option w/o the disk
- A Compact Flash to IDE card (that actually accepts SD cards). With this, I can emulate an older drive and easily remove the storage bits and throw them in my modern machine
So at this point I’m excited, I throw a few games on there and relive 30 years ago for a bit, but then it’s down to work. The real time clock (RTC) had a battery that was integral to the chip, and you can’t really get replacements. I ended up defiling the case with a file (so filing the case?!?) and soldering on a CR2032 battery (more here if you want to read). I also retrobrighted some of the case, but even in the hot Texas sun, it didn’t work all that great.
Sadly, in that thread I linked, somebody mentioned that I “couldn’t have picked a worse machine”. I didn’t know, I was young back then and I knew “Everything” about using jumpers to set up IRQ / DMA / etc — but that memory faded.
These old Compaq machines didn’t work off of CHS (Cylinders, Heads, Sectors) settings, instead they used an abstraction… Drive “Types”. This awful Apple-esque way of doing it meant that I couldn’t, in no way, specify what drive I was using. Further — after talking to people over there, it turns out that MS-DOS/Windows are shit for full disk (data + whitespace) backups. I guess they don’t allow RAW disk access, though DOS may allow you to emulate it with BIOS calls, no decent and free software existed.
I then posted a wanted ad for machines that would fit. It turns out I need a machine that has a BIOS that will support those settings, and apparently that was available even into the earlier Pentium range (I, II, III). Thanks to GiGaBiTe, he had a few machines that fit the bill.
That weekend, I planned to drive from Dallas down to Austin, pick up the machines (which he graciously offered for free), grab dinner with him, and I was going to get a hotel. A few things impacted that: First, it’s Austin. Cheap hotels don’t exist, especially during SXSW, so I was looking at >$275 a night.
I was not going to spend that much, I didn’t have it free for some old data on top of the $150 I smoked on the Compaq. So, I opted to sleep in my truck. I went to walmart to get a blanket (which is STILL in the packaging 4 months later in my truck)… I also wear a CPAP because I eat more than I burn and my jawline is an innie (self deprecating humor is all I have). So, I’d either need an outlet or to potentially just die in my sleep.
I decided to reach out to him, seeing if I could grab them the night before we agreed to meet — and thankfully he was down. We talked for a bit about older systems and it was a good time. I made sure to give him a bit of cash since I promised BBQ in exchange. He’s a really cool guy, worth reaching out to.
Now, loaded with four computers, I drove back up to Dallas — my international friends may think “That’s just two cities in a state”, but they’re 3.5-4hrs apart, so I spent an entire work shift just driving. I got home, and sadly didn’t have a great deal of time to work on them. I was doing a Malware talk in Milwaukee and had to get my shit together for that.
It wasn’t until now, mid July 2023 that I had a chance to yank all of this back out and found a solution.

My backup station — an old Compaq Celeron system that is bridging the gap between
THREADRIPPER
and
ANTIQUE
So, what I did is 3D print a drive bay mount for the SD card to IDE adapter. It would be perfect if there were space for it, but there isn’t and I’m fine with it. The idea was to provide some sort of insulating protection instead of letting a raw circuit board slap around inside of a metal case full of various voltages.
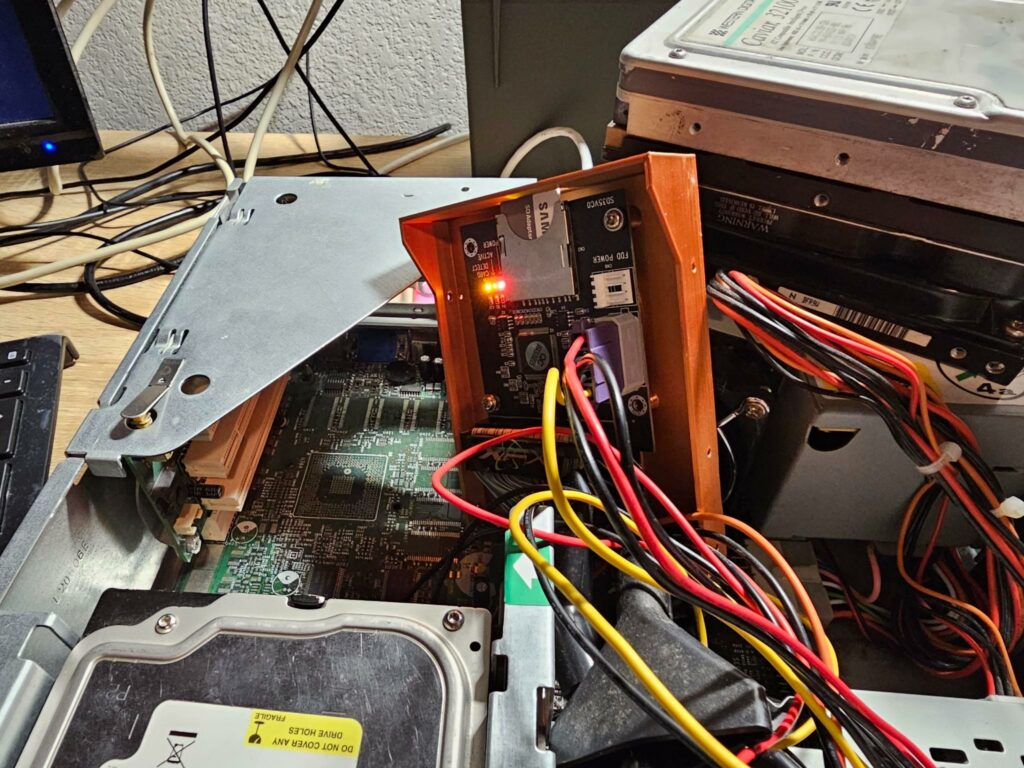
(The weird copper thing stuck up in the air)… It’s good enough.
So, I started by backing up a few GB disk. Was the first one I grabbed. I used ddrescue (not dd, not dd_rescue… ddrescue) and slapped it in the “~” user’s folder.
Well, that had like 200MB free because I was using MicroKnoppix on an SD card. So that ran out of room. No biggy, I moved the image and the mapfile over and restarted it in another directory.
Some time goes by and then “BOOM TRYING TO WRITE TO A READ ONLY FILESYSTEM”
I try ignoring it a few times, and then every Linux Admin’s WORST nightmare
KERNEL PANIC
Kernel panic is Linux’s BSOD — it’s crapping the bed. I ended up shutting it down, grabbed the disk and copied the backup image and mapfile off, and then tried to boot again. It wouldn’t work.
So then, I tried to format a 16GB USB drive I had laying around. Windows is shitty and incompetent, so I ended up using my Xubuntu laptop from 2011 to delete the partition data, format it, and get it ready to go again.
So, what I have now:
- Celeron machine (P3 equivalent)
- The SD card to IDE with Microknoppix 9.1 installed on the MASTER part of the IDE cable
- A totally blank USB drive (16GB, you want one a bit bigger than what you’re cloning) in the USB port
- Whatever shitty disk I’m backing up in the SLAVE part of IDE (make sure the jumpers match).
Fun Fact!
You might be used to the “Master / Slave” nomenclature that IDE uses (I’m aware people are trying to change it, but that’s literally what is inscribed in the silk screen on every IDE drive ever). But, some of my older drives use C/D… In my case, if the jumper is PRESENT, it’s treated as the “C” drive, or IDE MASTER. If it’s absent, it’s the IDE SLAVE (or D drive).
This is good to know because these old drives don’t give a fuck about their position on an IDE cable and will take it over. This is obvious if you start the machine and you see “Starting MS-DOS…” or “Invalid System Disk” or whatever. That isn’t Knoppix.
Cooking Sites
You know how every cooking site has a dumb story leading up to the recipe, which is the part you care about? Same thing here. If you’re just looking to back stuff up, you don’t care about my essay above. Made you read it tho, didn’t I?
THIS IS WHAT WORKED FOR ME. I’m lazy, so this should work for you too. If it doesn’t, you’re lazier than I am and you should be ashamed.
- Download the ISO for Knoppix 9.1
- I went to the US download page at the bottom, http, and then the CD list. Grabbed this:
- KNOPPIX_V9.1CD-2021-01-25-EN
- ddrescue and hwinfo were already part of the distro, as well as nano, but add if needed.
- I went to the US download page at the bottom, http, and then the CD list. Grabbed this:
- Using Raspberry Pi imager, “burn” image to SD card and use it on the SD to IDE drive
- Start up. The display may freak out (flicker, bad V-HOLD, etc), if so press:
- Press Ctrl+Alt+F1 at this point. It should drop you to the prompt where you can use it CLI
- Run hwinfo –short > list.txt (NOTE IT IS TWO DASHES BEFORE SHORT)
- Run nano.list.txt, and look for the affected drive (probably the one that doesn’t reference compact flash)
- Ensure you’re somewhere that will hold the disk volume, maybe double that, not sure. External disk that isn’t the SD card?
- Sudo mkdir ~/POO
- sudo mount /dev/sdb1 ~/POO
- cd ~/POO
- Mounts the USB target of the backup to the POO directory, because poo funny
- Run:
- Sudo ddrescue -f -d /dev/sdb backup.img backup.log
- Be sure the above works for the disk from hwinfo, and that you want the output called backup.img
- Backup.log is required for it to function
- Adding “-R” (caps) might be a good idea, forces ddrescue to work backwards, thus busting the drive’s cache and potentially restoring more data
Remove USB and copy to a different machine, clear USB and repeat.
With the USB:
- You can open the generated backup.img in a hex editor and search for strings, for example, I might search for my name or similar to verify it was one of my drives and that the image is valid.
- You can download photorec (there’s an executable called qphotorec) and that allows you to specify the image at the top and an output folder on the bottom.
More to come from this. It’s 12:34 AM and I’m tired and I have a drive backing up that promised me it would be done in 33 minutes. I’m 12 hrs, 12m deep and it’s still calling for 9 more hours (and has for the last 6 hours). There’s a ton of bad sectors BUT slowly the “Percent Rescued” has moved up, meaning it’s working.
I hope this helps. Comment if I can help further, and if your comment is too complex or confusing I’ll just report it as spam so I continue to look smart.
UPDATE 2023/07/19: This process has mostly been working for me, I’m 20 drives down now, but a few key modifications:
- Photorec (or qphotorec) works well, but “R-Undelete“, from the makers of R-Studio, actually seems to find a lot more. It’s free as well, but it won’t restore anything > 256KB from NTFS — but will from anything on FAT8/12/32/64/etcetc.
- I am using a Windows machine to parse through the completed images. For some stupid reason, Windows likes to screw with a “hibernation file” if you uncleanly eject a USB drive. On the flip side, the USB to SATA connector I was using also didn’t show up in the list of things to eject, so any time I had used that connector and moved it from Windows back to Knoppix, I’d have to run:
- ntfsfix /dev/sdb1 (note drive and partition here)
Encryption
Yes, what I’m doing here is really a forensic analysis of the drives — taking mirror copies of them while they still run, full, sector-by-sector copies. This means I’m copying the files, but I’m also copying the freespace. On a new drive, this would be dum (misspell it to anger trolls).
On these drives, however, I want to find stuff I’ve since wiped. Since these drives are old, I never encrypted them, and nor did some of the other random people’s drives I somehow ended up with.
One drive in specific has dozens of these people in the town I used to live with their kids at boyscout meets, derby car races, on vacation, and in Ta-Kwon-Do. I’ve also found their names. I’d like to do the right thing and reach out and be like “yo, not sure if you lost these” and send them a USB stick. But, as a parent, that would also be really weird. So, I’ll probably just end up destroying the drive, deleting the image, and calling it a day.
For this reason, you should always:
- Backup your drives
- Encrypt your drives
Leave a Reply